


Need to move photos from a Windows PC to your iPhone without opening classic iTunes? In 2026, Apple’s official path on Windows is the free Apple Devices app from the Microsoft Store. You can also use iCloud Photos, Google Photos, OneDrive, or email for smaller batches.
iTunes is no longer the primary Windows tool for this job. Apple Devices handles USB (and Wi-Fi) photo sync when iCloud Photos is off, while cloud apps keep things wireless. Below are six practical methods, starting with Apple’s official app, plus cloud and email options. For the reverse direction, see our guide on transferring photos from an iPhone to an external drive.
Pick the method that matches your setup: Apple Devices for folder sync over cable, iCloud Photos if you already pay for iCloud storage, or a cloud drive when you only need a handful of shots.
Table of Contents
Method 1: Transfer Photos from PC to iPhone with Apple Devices (Recommended)
Apple Devices is Apple’s current Windows app for connecting an iPhone over USB or Wi-Fi. Use it when you want official folder sync without classic iTunes. Apple documents this flow in its Apple Devices photo sync guide.
Important: If iCloud Photos is turned on, Apple Devices will not show local photo sync options. Turn off iCloud Photos on the iPhone (Settings > [your name] > iCloud > Photos) only if you intentionally want cable sync instead of cloud sync.
Pros:
- Official Apple app for Windows 10 and later
- Syncs selected folders or your full photos library
- Works over USB/USB-C, with Wi-Fi sync available after the first cable setup
- Optional Include videos checkbox
Cons:
- Local sync is unavailable while iCloud Photos is enabled
- You still need to connect (or keep Wi-Fi sync enabled) and tap Apply to push changes
1. Install Apple Devices from the Microsoft Store on Windows 10 or later.
2. Connect your iPhone with a USB or USB-C cable. Unlock the phone and tap Trust if prompted.
3. Open Apple Devices, select your iPhone in the sidebar, then select Photos.
4. Check Sync Photos to your device from, choose your photos library or folder, then pick All folders or Selected folders.
5. Optionally enable Include videos, then select Apply. Wait for the sync to finish and use Eject before unplugging.
Tips: Synced photos show up in the Photos app on iPhone. If you need the reverse path (iPhone storage cleanup), see how to transfer photos from an iPhone to an external hard drive and how to use AirDrop for nearby Apple devices.
Method 2: Transfer Photos from PC to iPhone with iCloud
iCloud is Apple’s cloud service that can help you sync photos from PC to iPhone wirelessly. It offers a different useful method of transferring photos from your PC to your iPhone without using iTunes. Photos will be easily accessible throughout your Apple ecosystem thanks to iCloud’s seamless connection with Apple devices. iCloud Photos allows you to upload photos from your PC to the cloud and access them from the Photos app on your iPhone. You may make shared albums using iCloud Photo Sharing and invite others to view or add photos.
Pros:
- It is convenient and easy to use. You don’t need a USB cable or any third-party software.
- It is secure and reliable. Your photos are stored in iCloud with encryption and backup.
- It syncs photos automatically across all your devices. Any changes you make on one device will be reflected on others.
- It offers cloud storage space for your photos. You can free up space on your devices by storing photos in iCloud.
Cons:
- It requires an internet connection and a Wi-Fi network. You may encounter slow speed or errors if the network is unstable or unavailable.
- It has limited free storage space. You only get 5GB of iCloud storage for free. If you need more space, you have to pay for iCloud+ plans.
- It may cause format compatibility issues. If you upload HEIC photos from your PC, they may not be viewable on some devices or platforms.

- On your PC, go to icloud.com and sign in with your Apple ID and password.
- Click on the Photos icon and then click on the Upload button at the top right corner.
- Select the photos or folders you want to upload from your PC and wait for them to be uploaded to iCloud.
- On your iPhone, go to Settings > [your name] > iCloud > Photos and turn on iCloud Photos.
- Your photos will be available on your iPhone’s Photos app once synchronization is complete.
Method 3: Transfer Photos from PC to iPhone with File Explorer
2026 note: Windows File Explorer is most reliable for copying photos off an iPhone (DCIM) to a PC. Copying PC folders onto the iPhone this way is limited or unavailable on modern iOS. Prefer Apple Devices or a cloud method for PC-to-iPhone transfers.
If you prefer a simple and direct way to transfer photos from PC to iPhone without iTunes, you can use File Explorer. It is the built-in file management tool in Windows, and can also be used to transfer photos from your PC to your iPhone. This method provides a straightforward way to copy images directly to your device. You can use File Explorer to copy photos from your PC to your iPhone via a USB cable.
Pros:
- No need for third-party software.
- Direct file management.
- Simple and straightforward.
Cons:
- Requires a USB cable connection.
- It has format restrictions.
- It may overwrite existing photos.
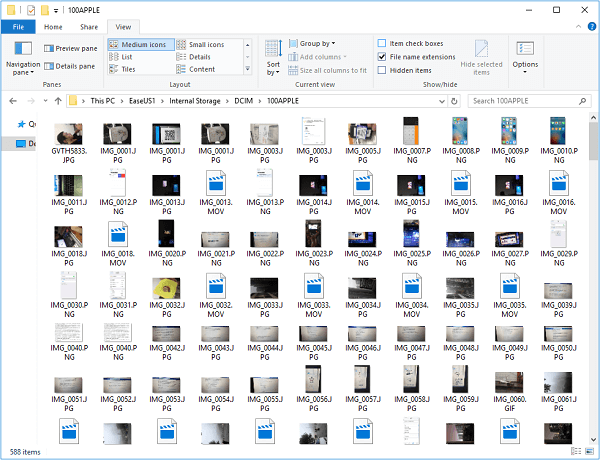
1. Connect your iPhone to the computer. Unlock your iPhone and trust the computer. If necessary, enter your iPhone passcode to continue.
2. Go to “This PC”> [your device name] > “Internal Storage”> “DCIM”> “100APPLE” and paste the photos from the computer to the folder.
3. Go to the Photos app on your iPhone to check the photos from the computer.
Method 4: Transfer Photos from PC to iPhone with Google Photos
If you want to transfer photos from PC to iPhone without iTunes and without a USB cable, you can use Google Photos. Google Photos offers a versatile platform for storing, managing, and transferring photos across devices. It’s a cloud-based service that seamlessly integrates with both Android and iOS devices, making it a convenient choice for photo transfers. You can use Google Photos to upload photos from your PC to the cloud and access them from your iPhone Photos app.
Pros:
- Free cloud storage for photos (up to 15 GB).
- Cross-platform compatibility.
- Automated photo backups.
- Easy photo sharing with others.
- User-friendly mobile app.
Cons:
- Compressed image quality for free storage.
- Requires an internet connection for access.
- It may not sync with your iPhone Photos app automatically.

- Log in with your Google account on Google Photos on your computer.
- Click ‘Upload’> ‘Computer’ in the upper right corner of the page, which will open a file explorer window for you to choose the pics you want.
- Select the photos and click ‘Open’ to upload them to your Google Photos.
- When it’s done, install and open the Google Photos app on your iPhone, and sign in with the same Google account. Your photos will be accessible via the Google Photos app on your iPhone.
Method 5: Transfer Photos from PC to iPhone with OneDrive
OneDrive, Microsoft’s cloud storage solution, effectively transfers photos between a PC and an iPhone. It seamlessly integrates with Windows and offers cross-platform support for easy access. You can use One Drive to upload photos from your PC to the cloud and access them from your iPhone Photos app. You can also use One Drive to backup, share, and edit your photos online.
Pros:
- Integrated with Windows.
- Accessible on various platforms.
- 5 GB of free storage.
- Collaborative sharing features.
- Easy file organization.
Cons:
- Limited free storage (5 GB).
- Requires an internet connection for synchronization.
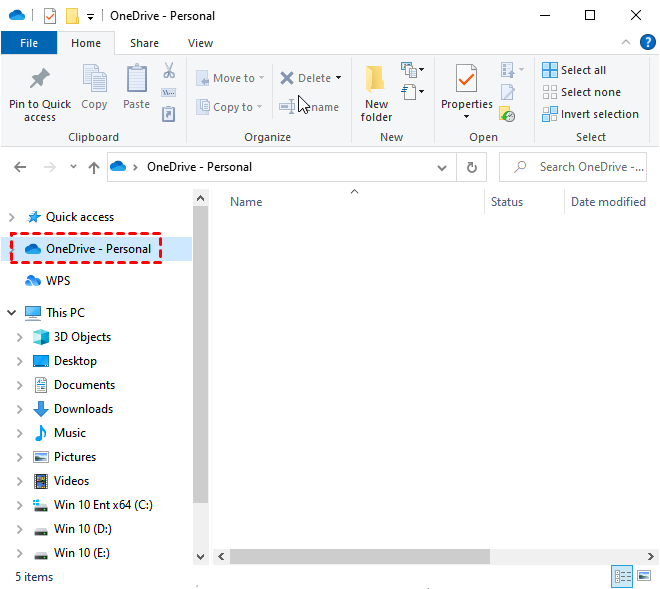
1. Click This PC, then find and click OneDrive – Personal on the left pane.
2. Sign in to your Microsoft account to activate OneDrive.
3. Save the photos that you want to transfer from PC to iPhone in Pictures.
4. Then, access OneDrive from your iOS device. Click to open the folder and then download to your Photos app.
Method 6: Transfer Photos from PC to iPhone with Email
Email is still a quick and easy way to transfer the occasional photo. You can access the photos on your iPhone by emailing them to yourself as attachments. Use Gmail, Yahoo Mail, Outlook, or any other email provider or application that you like. You can email attachments of images from your PC to your iPhone.
Pros:
- No additional software is required.
- Suitable for sending a few photos.
- Universal compatibility.
- User-friendly.
Cons:
- Limited by email attachment size limits.
- Not ideal for transferring a large number of photos.

1: Log into your computer’s email account. Create a new email and include the pictures you want to send to your iPhone.
2: Enter the same email address (or another one you own) in the addressee field, then click the send button.
3: Open your iPhone and log in using the email address you entered in the addressee box. Look through the inbox to find the email with the photographs attached. on save the images on your iPhone, download them.
Conclusion
In conclusion, transferring photos from your PC to your iPhone has never been simpler without iTunes. You have a variety of alternatives, like the feature-rich Apple Devices, the seamless iCloud integration, the ease of File Explorer, the cloud-based convenience of Google Photos and OneDrive, and the simple usage of email. Choose the method that best meets your requirements, and take advantage of easy and quick photo transfers in the age of digital media.
FAQs: Transfer Photos from PC to iPhone without iTunes
How do I transfer photos from Windows to iPhone without iTunes?
One way to transfer photos from Windows to iPhone without iTunes is by using a cloud storage service or app like Google Drive, Dropbox, or OneDrive. Follow these steps:u003cbru003eu003cbru003e1. Install and sign in to the cloud storage app on both your Windows computer and iPhone.u003cbru003e2. Upload the photos from your Windows computer to the cloud storage app.u003cbru003e3. On your iPhone, open the cloud storage app and locate the uploaded photos.u003cbru003e4. Select the photos you want to transfer and choose the option to download or save them to your iPhone’s Camera Roll or Photos app.u003cbru003eu003cbru003eBy following these steps, you can transfer your photos from Windows to iPhone without relying on iTunes.
How do I transfer photos from a computer to an iPhone directly?
You can use iTunes or iCloud to transfer photos from your computer to your iPhone directly. Here are the steps for each method:u003cbru003eu003cbru003eUsing iTunes:u003cbru003e1. Connect your iPhone to your computer using a USB cable.u003cbru003e2. Launch iTunes if it doesn’t open automatically.u003cbru003e3. Click on the device icon in iTunes to select your iPhone.u003cbru003e4. Go to the u0022Photosu0022 tab in the left sidebar.u003cbru003e5. Check the box next to u0022Sync Photosu0022 or u0022Copy Photos fromu0022 depending on your iTunes version.u003cbru003e6. Choose the folder or application from which you want to transfer the photos.u003cbru003e7. Click on the u0022Applyu0022 or u0022Syncu0022 button to start the transfer process.u003cbru003eu003cbru003eUsing iCloud:u003cbru003e1. Make sure you have iCloud set up on both your computer and iPhone with the same Apple ID.u003cbru003e2. On your computer, open a web browser and go to the iCloud website (www.icloud.com).u003cbru003e3. Sign in with your Apple ID and password.u003cbru003e4. Click on the Photos app.u003cbru003e5. Click on the u0022Uploadu0022 button (usually represented by a cloud with an arrow pointing upward).u003cbru003e6. Select the photos you want to transfer from your computer and click u0022Openu0022 or u0022Choose.u0022u003cbru003e7. Wait for the photos to upload to iCloud.u003cbru003e8. On your iPhone, go to u0022Settingsu0022u003e [your name] u003e u0022iCloudu0022u003e u0022Photosu0022 and toggle on u0022iCloud Photosu0022 or u0022Upload to My Photo Streamu0022 depending on your preference.u003cbru003e9. Your photos will now be synced to your iPhone automatically.u003cbru003eu003cbru003eChoose the method that suits you best and follow the steps accordingly to transfer your photos from your computer to your iPhone directly.
How do I transfer photos from USB to iPhone without iTunes?
You can transfer photos from USB to iPhone without iTunes using the following steps:u003cbru003eu003cbru003e1. Connect your USB drive to your computer and locate the photos you want to transfer.u003cbru003e2. Connect your iPhone to your computer using the appropriate USB cable.u003cbru003e3. On your computer, open the File Explorer (Windows) or Finder (Mac).u003cbru003e4. Locate your iPhone in the list of connected devices.u003cbru003e5. Open your iPhone’s folder and navigate to the u0022DCIMu0022 folder.u003cbru003e6. Create a new folder inside the u0022DCIMu0022 folder to store the transferred photos.u003cbru003e7. Copy the photos from your USB drive and paste them into the newly created folder on your iPhone.u003cbru003e8. Wait for the file transfer to complete.u003cbru003e9. Safely eject your iPhone from your computer.u003cbru003e10. On your iPhone, open the Photos app to view the transferred photos.u003cbru003eu003cbru003eThat’s it! You have successfully transferred photos from USB to your iPhone without using iTunes.
Can you transfer from PC to iPhone without iTunes?
Yes, you can transfer files from your PC to your iPhone without using iTunes by using third-party software like Apple Devices, iMazing, AnyTrans, or WALTR. These tools allow you to transfer files, such as photos, videos, music, documents, and more, directly from your PC to your iPhone. You can download and install this software on your PC, connect your iPhone via USB, and then follow the instructions provided by the respective software to transfer your files.
Is it possible to transfer photos selectively or in bulk?
Yes, it is possible to transfer photos selectively or in bulk.
What are the pros and cons of using iCloud for transferring photos from PC to iPhone?
u003cbru003eu003cstrongu003ePros of using iCloud for transferring photos from PC to iPhone:u003c/strongu003eu003cbru003eu003cstrongu003eu003cbru003e- Convenience:u003c/strongu003e iCloud provides a seamless way to transfer photos between devices without the need for cables or additional software.u003cbru003eu003cstrongu003e- Automatic syncing: u003c/strongu003eOnce you set up iCloud Photo Library, your photos will automatically sync across all your devices, ensuring you have access to your latest photos.u003cbru003eu003cstrongu003e- Storage space:u003c/strongu003e iCloud offers 5GB of free storage, which can be expanded with a paid subscription, allowing you to store a large number of photos without taking up space on your iPhone.u003cbru003eu003cbru003eu003cstrongu003eCons of using iCloud for transferring photos from PC to iPhone:u003c/strongu003eu003cbru003eu003cstrongu003eu003cbru003e- Limited free storage:u003c/strongu003e The free 5GB storage limit may not be sufficient to store all your photos, requiring you to purchase additional storage.u003cbru003eu003cstrongu003e- Internet dependency:u003c/strongu003e Transferring photos via iCloud requires a stable internet connection. If you have a slow or unreliable internet connection, the transfer process may be slow or interrupted.u003cbru003eu003cstrongu003e- File format compatibility:u003c/strongu003e iCloud may not support certain file formats or may compress images during the transfer process, potentially affecting the quality of your photos.u003cbru003eu003cstrongu003e- Cost: u003c/strongu003eWhile 5GB of storage is provided for free, additional iCloud storage requires a paid subscription, which may not be cost-effective for everyone.u003cbru003eu003cbru003ePlease note that the pros and cons mentioned here are general observations and may vary depending on individual preferences and requirements.
Do I need to turn off iCloud Photos before using Apple Devices sync?
Yes, it is generally safe and secure to transfer photos from a PC to an iPhone using third-party software like Apple Devices. However, it is always recommended to use reputable and trusted software from reliable sources to ensure the security of your data.
Where do synced photos appear on my iPhone?
Apple Devices supports the following file formats for transferring photos from PC to iPhone:u003cbru003eu003cbru003e1. JPEG (.jpg)u003cbru003e2. PNG (.png)u003cbru003e3. HEIC (.heic)u003cbru003e4. BMP (.bmp)u003cbru003e5. GIF (.gif)u003cbru003e6. TIFF (.tiff)





Share Your Thoughts