


For twenty years, the fastest way to see what was inside a Windows PC was to right-click This PC and hit Properties. One window: processor, installed RAM, system type, Windows edition, computer name, activation status. Then, in the October 2020 update (20H2), Microsoft redirected that shortcut to Settings > System > About, and the classic System page went quietly into hiding. Windows 11 carried on the same policy, and Microsoft has since confirmed that the classic Control Panel is being retired in favour of Settings across the board.
It is not gone, though. The underlying dialogs still ship with Windows — they are just no longer reachable the way muscle memory expects. Below are the methods that still work, on both Windows 11 and late builds of Windows 10, plus a clear note on the one that stopped working.
First, the method that no longer works
The widely-shared trick was to press Windows + R and run:
explorer.exe shell:::{BB06C0E4-D293-4f75-8A90-CB05B6477EEE}That CLSID is the classic System page’s shell identifier, and pasting it into the Run box worked beautifully — right up until Microsoft removed the handler. From Windows 10 build 20241 onwards, and throughout Windows 11, running it from the Run box typically just bounces you to Settings > System > About instead. If you have tried it and wondered why every tutorial says it works, that is why.
The good news: the CLSID itself is still valid. It just needs a different door.
Method 1: The folder-name trick (most reliable)
This is the method that has held up best across Windows 10 20H2 and later, and Windows 11. You create an ordinary folder and give it a special name that turns it into a shortcut to the shell object.
- Right-click an empty spot on your desktop and choose New > Folder. (On Windows 11, you may need Show more options first.)
- Name the folder exactly this, including the dot and both braces:
System.{BB06C0E4-D293-4f75-8A90-CB05B6477EEE}- Press Enter. The GUID part vanishes and the folder becomes an icon simply labelled System.
- Double-click it. The classic System Control Panel page opens.
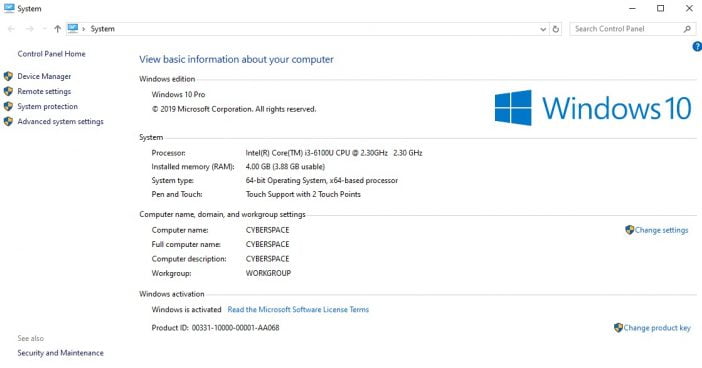
The icon is permanent and behaves like any other desktop item, so you can drag it into a folder, pin it, or leave it where it is. If you ever want it gone, delete it like a normal folder.
If the name reverts or errors: you almost certainly mistyped a character. Copy the string above rather than retyping it — the braces and the dot before the opening brace both matter.
Method 2: A desktop shortcut
A shortcut still resolves the CLSID on many builds, even where the Run box refuses to. It is worth trying, and it has the advantage of letting you name and place it however you like.
- Right-click the desktop and choose New > Shortcut.
- In the location box, paste:
C:\Windows\explorer.exe shell:::{BB06C0E4-D293-4f75-8A90-CB05B6477EEE}- Click Next, give it a name — System Info, About This PC, whatever you will recognise — and click Finish.
- Double-click it to test.


Right-click the finished shortcut to Pin to Start or Pin to taskbar, and you have a one-click route to your specs. If the shortcut opens Settings instead of the classic page on your build, fall back to Method 1 — the folder trick is the more dependable of the two.
Method 3: sysdm.cpl — the supported route
If what you actually want is the classic System Properties dialog — the tabbed box with Computer Name, Hardware, Advanced, System Protection and Remote — that one was never removed and needs no tricks at all. It is where you go for environment variables, virtual memory, performance options, System Restore configuration and Remote Desktop.
Press Windows + R and run either of these:
sysdm.cpl
SystemPropertiesAdvanced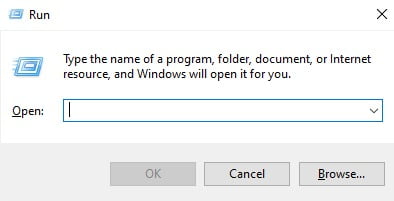
Both work from the Run box, from a Command Prompt or PowerShell window, and from File Explorer’s address bar. Because these are real system executables rather than shell namespace objects, they are not going anywhere. For a permanent shortcut, point one at C:\Windows\System32\SystemPropertiesAdvanced.exe.
Related commands worth memorising while you are here:
SystemPropertiesComputerName— straight to the Computer Name tabSystemPropertiesProtection— System Restore settingsSystemPropertiesRemote— Remote Desktop settingsSystemPropertiesPerformance— visual effects and virtual memory
Method 4: msinfo32, for far more detail
If the reason you wanted the old System page was simply to read your specs, System Information is strictly better and has been in Windows since the nineties. Press Windows + R and run:
msinfo32You get BIOS version and date, motherboard manufacturer and model, exact Windows build number, installed and available physical memory, virtual memory, secure boot state, and a full tree of hardware resources, components and software environment. There is a search box at the bottom and a File > Export option that dumps everything to a text file — genuinely useful when you are sending your configuration to a support desk or a forum.
Other ways to read your specs quickly
- Settings > System > About — the official replacement. It has processor, RAM, device ID, system type, edition and build, plus a handy Copy button that puts the whole block on your clipboard. For most everyday questions it genuinely is enough.
- Windows + Pause/Break — still the fastest keyboard route, though it now lands on the Settings About page rather than the classic screen.
dxdiag— the DirectX Diagnostic Tool, the quickest way to see your GPU, its driver version and how much video memory it has.winver— a tiny box with your exact Windows version and build number. The first thing to run when a guide says “this requires build X or later.”- PowerShell: run
Get-ComputerInfofor a scriptable dump of essentially everything, which you can filter or pipe to a file. - Task Manager > Performance — live CPU model and core count, memory speed and slot usage, disk type and GPU details, all in one place.
Why Microsoft keeps taking these away
The Control Panel and the Settings app have coexisted awkwardly since Windows 8, and maintaining two parallel interfaces for the same system state is a genuine engineering cost as well as a confusing experience. Microsoft has been migrating pages across one at a time and has publicly confirmed that Settings is the destination and the classic Control Panel is on the way out. The System page was one of the earlier casualties precisely because Settings > About had already reached feature parity for most users.
The practical consequence: tricks like the CLSID methods above are unsupported, and any of them could stop working in a future update. The commands in Methods 3 and 4 are the ones to commit to memory, because they are real, supported executables. If you like keeping the old furniture, it is also worth knowing how to put the This PC icon back on your desktop and how to tame the Start menu.
FAQs
Does the shell:::{BB06C0E4…} command still work in Windows 11?
Not from the Run box. Microsoft removed that handler after Windows 10 build 20241, so on current builds it redirects to Settings. The CLSID still works through the folder-name trick (Method 1) and, on many builds, through a desktop shortcut (Method 2).
Is this the same as System Properties?
No, and the distinction matters. The classic System page is the read-only overview of your PC (processor, RAM, edition, activation). System Properties is the tabbed settings dialog you get from sysdm.cpl, where you change environment variables, virtual memory and Remote Desktop. Most people looking for “the old System screen” want the first; most people who need to change something want the second.
Is the Control Panel gone entirely?
Not yet. Type Control Panel into Start and it still opens on Windows 11, and several applets have no full Settings equivalent. But Microsoft has confirmed the direction of travel, and pages have been migrating to Settings steadily for years.
Do I need administrator rights for any of this?
Not to open any of these screens or run any of these commands. You will need admin rights to change settings inside System Properties — renaming the computer, editing system environment variables, or altering virtual memory.
Is the folder trick safe?
Yes. You are creating an ordinary folder whose name Windows recognises as a pointer to a built-in shell location. Nothing is installed, no registry keys are written, and deleting the folder undoes it completely.
Which method should I use?
If you want the old System overview screen, use Method 1. If you want the settings dialog, use sysdm.cpl. If you want detailed specs to send someone, use msinfo32 and export to a text file.
The bottom line
The classic System page is hidden, not deleted. A folder named System.{BB06C0E4-D293-4f75-8A90-CB05B6477EEE} brings it straight back on Windows 11 and Windows 10, and takes fifteen seconds to create. For everything else — the tabbed settings dialog, the full hardware inventory, the exact build number — sysdm.cpl, msinfo32 and winver are supported, permanent, and worth knowing by heart. The old Run-box command from the previous generation of guides, unfortunately, is not one of them any more.




On Windows 10, no matter the version (1903, 2004, 20H2, 21H1), one can simply right-click the “System” category in Control Panel and select the options: “Open” or “Open in new window”