A process in which a computer power-ups and starts the operating system is known as booting. Usually, a PC uses hardware installed on the computer to boot it up, but other storage devices, such as external hard drives and USB flash drives can also be used to boot up your machine.
Making a bootable USB is a great way to install an operating system like Windows, Linux, or macOS on a computer. This is especially useful if you don’t have access to an optical drive or if you need to install an operating system on multiple computers. Making a bootable USB is not difficult and can be done in a few simple steps.
In order to make a bootable USB, you will need a USB flash drive with at least 4GB of storage and an ISO file of the operating system you want to install. You will also need a Windows or Mac computer that has a USB port and the necessary software to create the bootable USB.
Once you have the necessary components, you can begin the process of making a bootable USB. The first step is to format the USB drive. This will erase any data on the drive and prepare it for the bootable image. Then, you will need to download a program such as Rufus, which is a free and open-source utility for Windows, or Etcher, which is a free and open-source utility for Mac and Linux.
After the program is downloaded, you can open it and select the ISO file you want to use to create the bootable USB. Once the ISO file is selected, you can click the “Start” button and the program will create the bootable USB. This process may take a few minutes to complete.
Once the bootable USB is created, you can insert it into the USB port of the computer you want to install the operating system on and restart the computer. The computer should boot from the USB drive and you can follow the on-screen instructions to install the operating system.
Making a bootable USB is a great way to quickly and easily install an operating system on a computer. With the right tools and a few simple steps, you can create a bootable USB in no time. Here are step by step guide for all the methods to make a bootable USD drive.
Table of Contents
Why do you need a bootable USB stick?
A bootable USB drive can be useful in many ways. For example, if your computer is affected by a virus and won’t boot or system failure caused BSoD (Blue Screen of Death), you can use a bootable USB drive to run an operating system directly from a USB stick. You can also use a bootable USB drive to install a new operating system on a computer.
Requirements:
Make sure you fulfill the following requirements before starting:
- An ISO file of the required OS.
- A USB with at least 4-8GB of space or more (depending on the OS size).
- Have patience!
Now, let’s look at two popular ways to create a bootable USB drive:
Disclaimer: Remember to back up your data before starting because your flash drive will be erased while creating a bootable USB. In case of any damage, we are not responsible.
Bootable USB installers
There are several bootable USB installers, but Rufus is my favorite because it’s faster than others. But I also use the Universal USB installer because it lets you choose the OS you want to install. Let’s have a look at how to make a bootable USB stick:
Rufus
Download Rufus from their website. You don’t have to install it on your PC. Just run it and proceed. First, plug your USB drive and follow the steps given below.
- Run Rufus bootable USB maker.
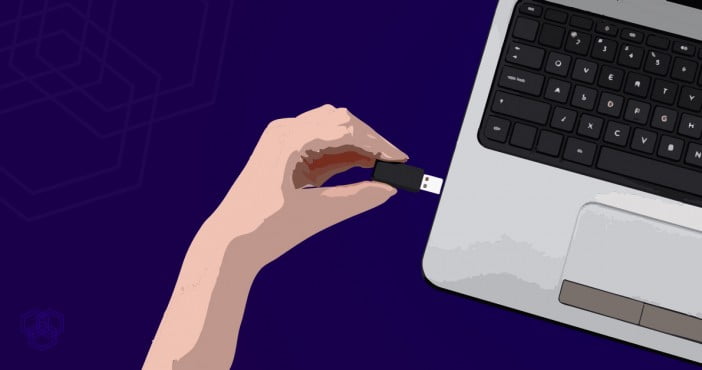
- Plug in your USB flash drive if you haven’t already.
- Select the USB drive under Device.
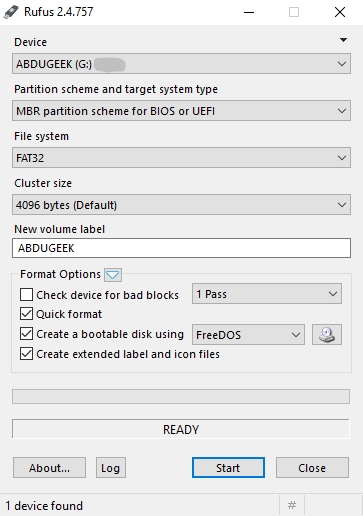
- Now, click FreeDOS and select ISO Image to install Windows ISO.
- Click the DVD icon beside the ISO image option and select the ISO file you want to install.
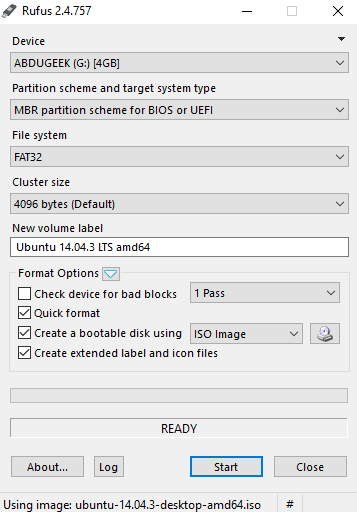
- Press the Start button and wait for the procedure to complete.
- After completion, close Rufus; your USB flash drive is now a bootable USB.
Universal USB Installer
Just like Rufus, Universal USB Installer lets you make your USB bootable. But one useful thing about this particular software is that it lets you choose the OS that you are going to install.
- Download and open Universal USB Installer and click Yes.
- You will see another pop-up asking you to accept the license agreement to run the software, press I Agree, and proceed.
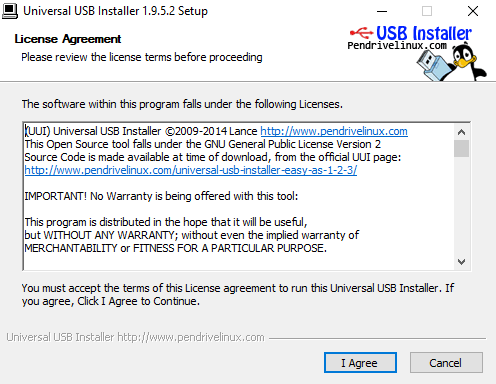
- Select the operating system from the drop-down that you want to install.
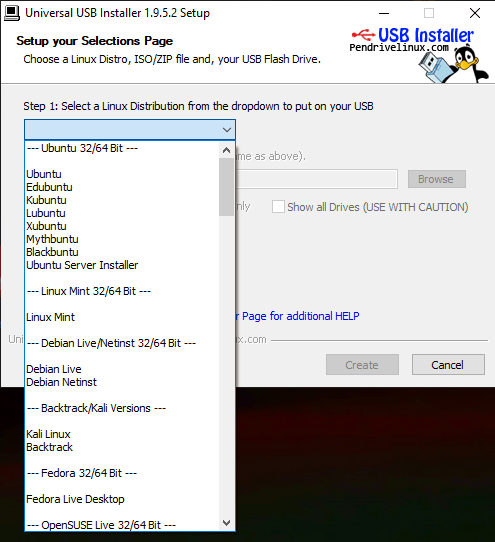
- Click Browse and navigate to the .iso file that you want to install. Select the required ISO file.
- Select your USB flash drive from the drop-down menu.
- It’s necessary to format the USB, so check the Format Drive option. (Remember, it will erase content on your USB drive.)
- In the final step, click Create and then wait for the completion of the process.
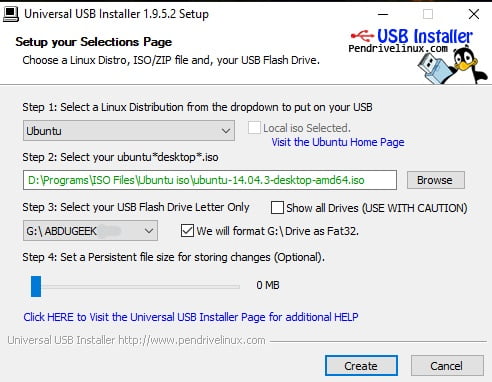
After completion, unplug your USB. Now you can install your favorite Linux, Windows, or any other supported operating system using your bootable USB.
Windows media creation tool
Windows media creation tool is an official tool provided by Microsoft to upgrade from the old operating system to Windows 10. Remember, this tool will only let you create installation media for Windows 10.
Here is how to do it in simple steps:
- Download and run the Windows media creation tool from the official Microsoft website.
- Insert your flash drive and wait for the media creation tool to finish the early setup.
- A license agreement will appear on your screen; click Accept and proceed to the next step.
- It will now ask you to perform the required task; instead of updating your Windows, select Create installation media (USB flash drive, DVD, or ISO file) for another PC option.
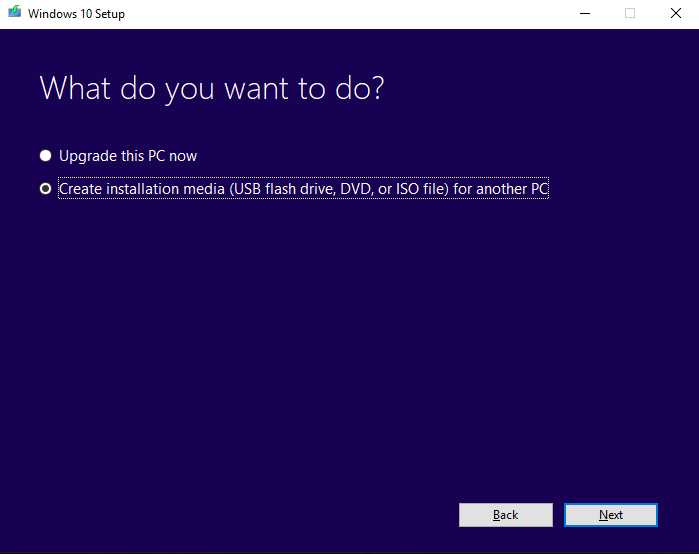
- Select language, architecture, and the Windows edition you want to install and click Next.
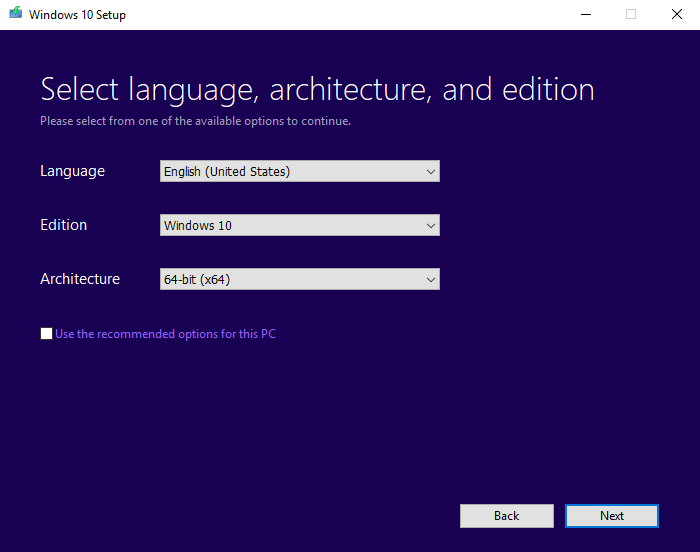
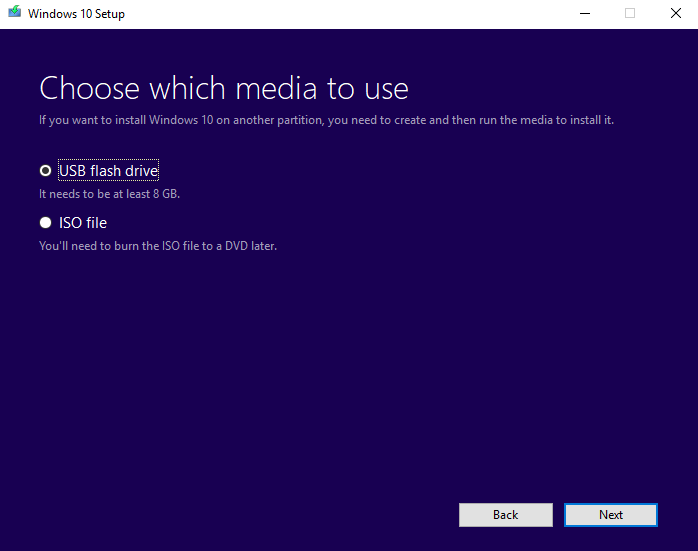
- In the next step, choose which media to use. Select a USB flash drive (minimum 8GB) and proceed. (You can also select ISO file and download the ISO file to use it later.)
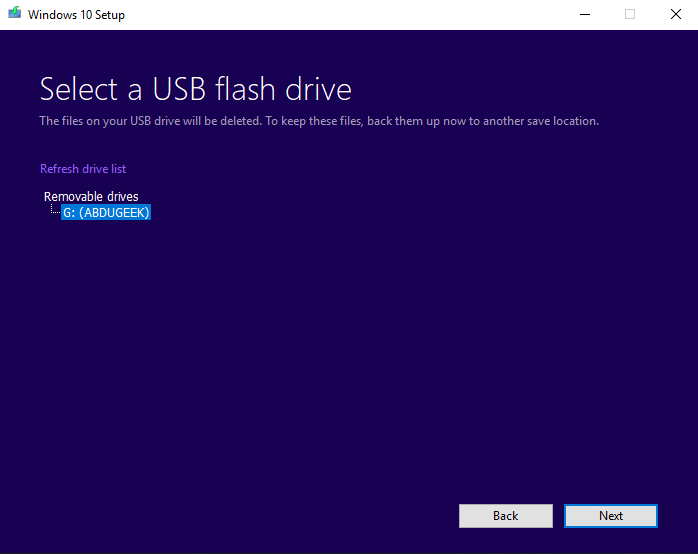
- Now, select your USB stick from the Removable drives that you are using for this process. Remember, the data will be deleted as it is necessary to format a flash drive to make it a bootable USB.
- Please start the process and wait till the Windows media creation tool downloads the whole Windows OS and installs it on your USB.
This process can take more time than the usual methods. The Windows media creation tool will take hours because it downloads the ISO file and then installs it on your USB stick. So, the speed depends on the internet connection. USB installers will take time depending on your USB’s read & write speed and the size of the operating system that you are putting in it.
Video Tutorial on How to make a Bootable USB
If you have any questions about the guide, ask away in the comments section below.
Frequently asked questions
What are the different operating systems that can be installed using a bootable USB stick?
Microsoft Windows 10
Apple macOS
Ubuntu
Fedora
Linux Mint
Zorin OS
CentOS
Kali Linux
OpenSUSE
FreeBSD
How long does the process of creating a bootable USB stick take?
The amount of time required to create a bootable USB stick will depend on the size of the USB stick, the size of the bootable media that is being used, and the speed of the computer used to create the bootable USB stick. Generally, the process can take anywhere from a few minutes to an hour or more.
What should be done if the USB stick is not recognized during the booting process?
1. Check the boot order in the BIOS/UEFI settings and make sure that the USB drive is listed first.
2. Make sure that the USB drive is properly inserted into the computer.
3. Check the USB drive for any physical damage or loose connections.
4. Make sure that the USB drive is formatted correctly.
5. Try a different USB port or a different computer.
6. Check that the USB drive is compatible with the computer’s operating system.
7. Install the latest version of the BIOS/UEFI.
8. Try a different USB drive.
![How to change default apps in Windows 10 [Video] 12 How to change default apps in Windows 10 [Video]](https://techengage.com/wp-content/uploads/2019/05/change-default-apps-windows-10-jpg-webp.webp)

Share Your Thoughts