Microsoft brought the Start menu back in Windows 10 after the backlash that followed its removal in Windows 8. That decision alone probably saved the operating system. The Start menu became the central hub for launching apps, organizing your workflow, and accessing system settings — and despite Windows 10 reaching its official end of support in October 2025, roughly a third of all Windows users worldwide are still running it daily in 2026.
Whether you just never upgraded or your hardware doesn’t meet the Windows 11 TPM 2.0 requirements, your Start menu deserves some attention. Most people never touch its settings, which means they’re missing out on genuine productivity gains. This guide walks through every customization option available — from basic layout changes to registry-level tweaks that transform how the Start menu behaves.
Table of Contents
Anatomy of the Windows 10 Start Menu
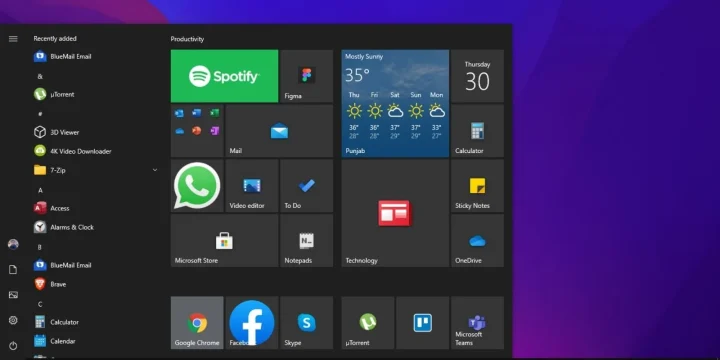
Before changing anything, it helps to understand what you’re working with. The Windows 10 Start menu is split into three distinct zones:
- Left sidebar: Your user account icon, power button, Settings gear, File Explorer shortcut, and any folders you’ve chosen to display (Documents, Downloads, Pictures, etc.). This narrow column stays fixed on the left edge.
- App list: An alphabetical list of every installed application. It sits between the sidebar and the tile area. You can scroll through it, jump to a specific letter by clicking any letter header, or hide it entirely.
- Tile area: The right portion of the Start menu where pinned app tiles live. You can organize these into named groups, resize individual tiles, and enable live updates for apps that support them.
Each of these zones can be configured independently, which gives you a surprising amount of control over how the menu looks and functions. Let’s break down every option.
Resize and Reshape the Start Menu
The default Start menu takes up a modest rectangle in the lower-left corner, but you’re not stuck with that size. There are three separate ways to change the Start menu’s dimensions, and most people don’t realize they can combine all three.
Drag to resize
Open the Start menu by clicking the Start button or pressing the Windows key. Hover your cursor over the top edge of the menu until it turns into a double-headed arrow, then drag upward or downward to adjust the height. You can do the same thing on the right edge to change the width — though horizontal resizing snaps in increments of one full tile column rather than pixel-by-pixel.
A lesser-known trick: you can also drag the top-right corner diagonally to resize both dimensions at once.
Show more tiles
If you want an extra column of tiles without manually dragging:
- Press Windows key + I to open Settings
- Go to Personalization → Start
- Toggle on “Show more tiles on Start”
This adds a fourth column of medium tiles to the tile area, letting you pin more apps without making the menu taller.
Full-screen Start
If you preferred the Windows 8 full-screen app launcher (or you’re using a tablet), you can bring it back:
- Open Settings → Personalization → Start
- Toggle on “Use Start full screen”
Now pressing the Windows key expands the Start menu across your entire display. Your tile groups spread out across the full width, and the app list slides in from the left when you click the hamburger menu icon. This mode works particularly well on touchscreen devices or if you’ve pinned dozens of apps and want quick visual access to all of them.
Pin, Unpin, and Organize App Tiles
Tiles are the most visible part of the Start menu, yet many people leave the default ones in place and never touch them. Here’s how to make the tile area genuinely useful.
Pin an app
Right-click any app in the app list (or a desktop shortcut) and select “Pin to Start.” The tile appears in the first available slot on the right side. You can also drag apps directly from the app list into the tile area.
Unpin an app
Right-click any tile and choose “Unpin from Start.” The tile disappears, but the app remains installed. This is purely cosmetic — nothing gets deleted.
Resize tiles
Right-click a tile, hover over “Resize,” and pick from four options:
- Small — Icon only, no label. Fits four in the space of one medium tile.
- Medium — The default size. Shows the app icon and name.
- Wide — Double the width of medium. Good for apps with live tile content.
- Large — Four times the area of medium. Best for Weather, News, or Photos where the live tile data is worth the real estate.
Not every app supports all four sizes. Desktop programs (.exe files) typically only offer Small and Medium, while UWP (Universal Windows Platform) apps from the Microsoft Store usually support all four.
Create tile groups
Drag a tile away from existing groups until it sits alone with a gap above it. A header bar reading “Name group” appears. Click it, type a name like “Work Apps” or “Games,” and press Enter. Now drag other tiles into that group to organize them by category. I keep mine organized into four groups: Daily Tools, Creative Software, Communication, and System Utilities. That single change cut the time I spend hunting for apps by at least half.
Rearrange tiles and groups
Drag any tile to reposition it within or across groups. To move an entire group, grab the two horizontal lines that appear next to the group name and drag the whole block up or down.
Manage Live Tiles
Live Tiles were one of Windows 10’s headline features borrowed from Windows Phone. They flip or rotate to show real-time information: unread email counts, weather forecasts, news headlines, photo slideshows, or calendar appointments — all without opening the app itself.
To control them, right-click a tile that supports live updates and look for the “More” submenu:
- Turn live tile on — Enables the animated content preview
- Turn live tile off — Shows just the static icon and app name
Personally, I keep live tiles active for Weather, Calendar, and Mail. Everything else gets turned off because the constant animation becomes distracting. Microsoft’s built-in apps like News, Sports, Money, and Photos all support live tile updates. Third-party apps from the Microsoft Store may or may not include them depending on the developer.
One thing worth knowing: live tiles pull data in the background, which uses a small amount of bandwidth and battery. If you’re on a laptop and trying to minimize background app activity, turning off live tiles you don’t actively use is a reasonable step.
Change Start Menu Colors and Transparency
The Start menu doesn’t have to be the default dark gray. Windows 10 gives you decent control over its color scheme, though there’s one catch most guides don’t mention.
Set an accent color
- Open Settings → Personalization → Colors
- Under “Choose your color,” select Dark or Custom (accent colors on the Start menu only work in Dark mode)
- Pick a color from the preset grid, or click “Custom color” to choose any hex value
- Scroll down and check the box next to “Start, taskbar, and action center”
Your Start menu, taskbar, and Action Center will now use that accent color as their background. If you also check “Title bars and window borders,” the color extends to app windows too.
The Light mode limitation
Here’s what trips people up: if you set your Windows mode to Light, the Start menu turns white and the accent color option for Start/taskbar grays out entirely. Microsoft designed it this way intentionally — they felt colored backgrounds clashed with the light theme. If you want a colored Start menu, you need Dark mode enabled for Windows (you can still keep apps in Light mode by choosing Custom under “Choose your color” and setting the app mode separately).
For a more complete visual overhaul, check out our guide on enabling Dark Mode across all of Windows 10.
Transparency effects
On the same Colors settings page, you’ll find a “Transparency effects” toggle. When enabled, the Start menu gets a subtle frosted glass effect that lets your desktop wallpaper bleed through slightly. It looks polished on modern hardware but can feel sluggish on older machines with integrated graphics. If your Start menu animations feel choppy, try turning this off.
Configure the App List and Sidebar
The alphabetical app list occupies a significant chunk of the Start menu. If you primarily use pinned tiles to launch apps, you might want to hide the list entirely for a cleaner look.
- Go to Settings → Personalization → Start
- Toggle off “Show app list in Start menu”
With the app list hidden, the Start menu shows only your tile groups and the left sidebar. You can still access the full app list by clicking the “All apps” button that appears in the sidebar, so nothing is lost — it just takes one extra click.
Two related toggles worth adjusting:
- Show most used apps — Displays a “Most used” section at the top of the app list. Useful if you have a few go-to programs you haven’t pinned. I keep this on because it surfaces apps I use frequently but forgot to pin.
- Show recently added apps — Highlights apps you installed recently at the top of the list. Handy for the first few days after installing something new, but the section can get cluttered if you install software often.
Choose Which Folders Appear on Start
The narrow left sidebar of the Start menu shows your profile picture, a gear icon for Settings, and the power button by default. But you can add quick-access shortcuts to up to ten system folders:
- Open Settings → Personalization → Start
- Click “Choose which folders appear on Start”
- Toggle on any of these: File Explorer, Settings, Documents, Downloads, Music, Pictures, Videos, Network, Personal folder, and This PC
Each enabled folder adds a small icon to the left sidebar, right above the power button. When the Start menu is collapsed, you’ll see just the icons. Hovering or expanding the sidebar reveals labels.
For most users, I’d suggest enabling File Explorer, Downloads, and Settings at minimum. If you frequently browse to your This PC location, adding that shortcut here saves a few clicks compared to opening File Explorer first.
Control Suggestions and Recently Added Apps
Microsoft uses the Start menu to recommend apps from the Microsoft Store. These appear as “Suggested” tiles mixed in with your pinned apps, and they’re essentially advertisements for software Microsoft thinks you should install.
To turn them off:
- Go to Settings → Personalization → Start
- Toggle off “Show suggestions occasionally in Start”
I recommend turning this off immediately. The suggestions are rarely relevant, and they take up tile space that could go to apps you actually use. This is one of the first things I disable on any fresh Windows 10 installation.
There’s a related toggle for recent files:
- Show recently opened items in Jump Lists on Start or the taskbar — When enabled, right-clicking an app on the taskbar or in the Start menu shows files you recently opened with that app. Useful for productivity (quick access to your last-edited documents), but a privacy concern on shared computers. Turn it off if others use your PC and you’d rather not broadcast your file history.
If you want more granular control over what Windows tracks and displays, our guide to disabling notifications in Windows 10 covers the broader notification and suggestion ecosystem.
All Start Menu Settings at a Glance
Here’s a consolidated view of every toggle available in Settings → Personalization → Start, along with what each one actually does:

| Setting | What It Does | Recommended |
|---|---|---|
| Show more tiles on Start | Adds a fourth column of medium tiles | On if you pin many apps |
| Show app list in Start menu | Displays the alphabetical list of all installed apps | On for most users |
| Show recently added apps | Highlights newly installed apps at the top of the list | On |
| Show most used apps | Shows a “Most used” section with your frequent apps | On |
| Show suggestions occasionally in Start | Displays Microsoft Store app recommendations | Off |
| Use Start full screen | Expands Start menu to fill the entire display | Off (unless on tablet) |
| Show recently opened items in Jump Lists | Shows recent files when right-clicking taskbar apps | On (off on shared PCs) |
| Choose which folders appear on Start | Adds system folder shortcuts to the left sidebar | Enable File Explorer, Downloads, Settings |
Keyboard Shortcuts Every Start Menu User Should Know
The mouse works fine, but keyboard shortcuts make the Start menu significantly faster. These are the ones I use daily:
| Shortcut | Action |
|---|---|
| Windows key | Open or close the Start menu |
| Windows + S | Open Windows Search directly |
| Windows + X | Open the Quick Link menu (Power User menu) with admin tools |
| Windows + I | Open Settings |
| Windows + E | Open File Explorer |
| Windows + R | Open the Run dialog |
| Windows + L | Lock your PC |
| Windows + D | Show or hide the desktop |
| Ctrl + Shift + Esc | Open Task Manager directly |
| Type after pressing Windows key | Instantly search for apps, files, and settings |
That last one is the single biggest time-saver. Instead of scrolling through the app list to find, say, the Disk Cleanup utility, just press the Windows key and type “disk cleanup.” The search results appear instantly, and pressing Enter launches the top result. Once you get used to this approach, you’ll rarely scroll through the app list at all.
The Windows + X shortcut deserves special attention. It opens a hidden power user menu with direct links to Device Manager, Disk Management, Command Prompt (or PowerShell), Event Viewer, System settings, and more. IT professionals and power users rely on this menu constantly — it’s faster than navigating through the Start menu or Control Panel for administrative tasks.
Power User Tweaks via Registry and Group Policy
The Settings app covers the basics, but the Windows Registry and Group Policy Editor unlock customizations that Microsoft doesn’t expose through the standard interface. Back up your registry before making any changes — a bad edit here can cause real problems.
Remove Bing search from the Start menu
When you search from the Start menu, Windows sends your query to Bing alongside searching your local files. Many users find this invasive or simply annoying. To disable it:
- Press Windows + R, type regedit, and press Enter
- Navigate to HKEY_CURRENT_USER\SOFTWARE\Policies\Microsoft\Windows\Explorer
- If the “Explorer” key doesn’t exist, right-click “Windows,” select New → Key, and name it Explorer
- Right-click inside the Explorer key, select New → DWORD (32-bit) Value
- Name it DisableSearchBoxSuggestions and set its value to 1
- Restart your PC
Your Start menu search will now only return local results — apps, files, and settings on your computer. No more Bing web results cluttering the search output. This alone makes the Start menu search feel noticeably faster and more relevant.
Restore the classic context menu behavior
If you’re on a Pro or Enterprise edition, the Group Policy Editor offers additional Start menu controls:
- Press Windows + R, type gpedit.msc, press Enter
- Navigate to User Configuration → Administrative Templates → Start Menu and Taskbar
Available policies in this folder include options to remove specific links from Start, prevent users from customizing tiles, lock the Start layout for managed devices, disable the “All Apps” list, and remove the power button. Enterprise IT teams use these policies through Intune or Microsoft’s device management tools to deploy standardized Start menu layouts across hundreds of machines.
Export and import a Start menu layout
You can back up your carefully arranged Start menu and restore it later (or deploy it to other PCs). Open PowerShell as administrator and run:
Export: Export-StartLayout -Path "C:\StartLayout.xml"
Import: Import-StartLayout -LayoutPath "C:\StartLayout.xml" -MountPath "C:\"
This is particularly useful if you’re setting up multiple computers with the same configuration, or if you want a backup before experimenting with changes.
Fix a Broken Start Menu
A Start menu that won’t open, freezes, or displays incorrectly is one of the most common Windows 10 complaints. Before you panic, work through these fixes in order — most problems resolve within the first two steps.
1. Restart Windows Explorer
Press Ctrl + Shift + Esc to open Task Manager. Find “Windows Explorer” in the process list, right-click it, and select “Restart.” The taskbar and Start menu will disappear briefly and come back. This clears most temporary glitches.
2. Run the System File Checker
Open Command Prompt or PowerShell as administrator (right-click the Start button if it works, or press Windows + X) and run:
sfc /scannow
This scans Windows system files and repairs any corruption it finds. The process takes 10-15 minutes. Follow it up with:
DISM /Online /Cleanup-Image /RestoreHealth
DISM repairs the Windows component store itself, fixing issues that SFC alone can’t handle.
3. Re-register Start menu apps
Sometimes the UWP apps that power the Start menu get corrupted. Open PowerShell as administrator and run:
Get-AppXPackage -AllUsers | Foreach {Add-AppxPackage -DisableDevelopmentMode -Register "$($_.InstallLocation)\AppXManifest.xml"}
You’ll see some red error text — that’s normal. The command re-registers all built-in Windows apps, which often fixes Start menu issues that survive a simple Explorer restart.
4. Create a new user profile
If nothing else works, the issue may be tied to your user profile specifically. Create a new local user account in Settings → Accounts → Family & other users. Log into that account and check if the Start menu works normally there. If it does, migrate your files to the new profile and retire the corrupted one.
Third-Party Start Menu Replacements
If the built-in Start menu doesn’t satisfy you — or if you miss the Windows 7 style — several third-party tools can replace it entirely.
Open-Shell (free)
Formerly known as Classic Shell, Open-Shell is an open-source project that gives you a Windows 7-style Start menu with deep customization options. You can choose between classic, two-column, and Windows 7 layouts. It also replaces the Start button icon and adds a toolbar to File Explorer. For users who find the Windows 10 tile system unnecessarily complex, Open-Shell strips things back to a clean, fast, text-based menu.
Start11 by Stardock (paid)
Start11 offers more polished options than Open-Shell, including Windows 7, modern, and hybrid Start menu styles. It also works on Windows 11, which makes it useful if you eventually upgrade but want to keep a familiar Start menu layout. Pricing starts around $6.99 for a single license. The software integrates with Windows search and supports taskbar customization alongside the Start menu changes.
StartAllBack (paid)
StartAllBack focuses on restoring the classic Windows aesthetic across the entire shell — not just the Start menu. It modifies the taskbar, File Explorer ribbon, and context menus alongside the Start menu. It’s particularly popular among users running Windows 11 who want the Windows 10 taskbar behavior back, but it works on Windows 10 as well for those wanting the Windows 7 look.
Windows 10 vs Windows 11 Start Menu
If you’re considering upgrading — or if you’re trying to decide whether to stay on Windows 10 — the Start menu differences are worth understanding. Microsoft fundamentally redesigned the Start menu in Windows 11, and the changes are divisive.
| Feature | Windows 10 | Windows 11 |
|---|---|---|
| Position | Bottom-left corner (fixed) | Center of taskbar (can be moved left) |
| Live Tiles | Yes — dynamic content previews | Removed entirely |
| Tile groups | Create and name custom groups | No tiles; pinned apps in a flat grid |
| Tile resizing | Small, Medium, Wide, Large | Not available (uniform icon grid) |
| App list | Visible by default alongside tiles | Hidden; requires clicking “All apps” |
| Recommended section | Optional suggestions (can disable) | Always present; limited removal options |
| Drag and drop | Drag apps to pin from app list | Restored in Windows 11 22H2+ |
| Folders in Start | Via sidebar shortcuts | Can group pinned apps into folders |
| Full-screen mode | Available | Not available |
The biggest loss in Windows 11 is Live Tiles. If you rely on them for at-a-glance information — weather, calendar, email — there’s no native replacement in Windows 11. Microsoft introduced Widgets as an alternative, but they live in a separate panel rather than being integrated into the Start menu. The Windows 10 Start menu is genuinely more customizable, which is one reason power users have been reluctant to upgrade.
Should You Still Customize Windows 10 in 2026?
Absolutely — with some caveats. Microsoft officially ended free security updates for Windows 10 on October 14, 2025. That means no more patches, no more bug fixes, and no more feature updates unless you pay for Extended Security Updates (ESU). Consumer ESU pricing runs about $30 per year per device, and Microsoft plans to offer these updates through October 2028.
StatCounter data from early 2026 shows Windows 10 still holding roughly 36% of the global desktop market. That’s hundreds of millions of active installations. People aren’t leaving because their hardware works fine, their software runs well, and the upgrade to Windows 11 requires TPM 2.0 hardware that many older but perfectly functional machines lack.
If you’re staying on Windows 10 for now, customizing your Start menu is one of the most impactful quality-of-life improvements you can make. It takes maybe five minutes to arrange your tiles, disable suggestions, set up keyboard shortcuts, and add folder shortcuts to the sidebar. Those five minutes save you a few seconds every single time you use your PC — and those seconds compound over months and years of daily use.
For further Windows 10 optimization, take a look at how to change your default apps, learn the fastest ways to take screenshots, and explore security tools that help protect a system that’s no longer getting free security patches.


Share Your Thoughts