You probably don’t want to face the hectic and tough methods of transferring your photos, videos, and files to other devices. Apple has ended this tiresome procedure through a simple, convenient, and most accessible AirDrop feature. Apple’s AirDrop is tremendously beneficial for sharing files, photos, and documents to nearby devices without even a little worry. You can share the essential data using AirDrop with other devices, including iPhones, iPod touch, iPad, and Macs.
Moreover, you can use this feature to transfer data between your own Apple devices. AirDrop gives you the relief from using Google Drive, Dropbox, and other tough methods. So, now you know the importance of the AirDrop feature, do you also know how to use it efficiently? Let’s know how to use AirDrop on Apple’s iPhone, iPod touch, and iPad.
What is Apple’s AirDrop?
AirDrop is a feature to share files, photos, videos, and much more with other Apple devices. However, knowing only this is not enough. AirDrop is available on iOS, macOS, and iPadOS. You can wirelessly share and receive files, documents, notes, map locations, photos, and much more through this feature. This single feature can give you freedom from using other laborious file-sharing methods. Let’s know more about this feature.
What should you do before using the AirDrop?
You just can’t haphazardly start sharing the file without following the essential protocols. Let’s know the things you should do before using the AirDrop.
- Duly note that the person with whom you want to share the files and documents stands in the range of Bluetooth and Wi-Fi.
- Take notice that the Wi-Fi and Bluetooth are on.
- For AirDrop to work, your Apple ID’s email address will be required. So, make sure that the person you want to share the files with has set the AirDrop to receive from the Contacts Only.
- If you are not in the Contacts of the persons you want to share the files with, then try to set the AirDrop receiving settings to Everyone.
- One more thing to note is that you can change your setting anytime to Receiving Off or Contacts Only. Depending on the situation, you can decide which option to use.
How to use AirDrop to share files on iPhone 11 or later
To share any file within any app, tap the Share icon. This will help you to share via AirDrop.
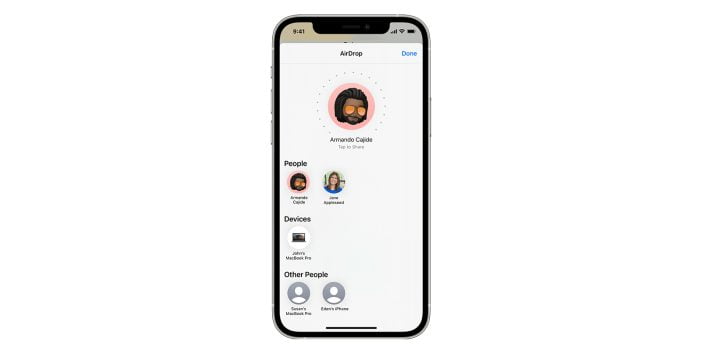
- Tap AirDrop. To prioritize the sharing with the person you want to share the file, point the direction of your device toward nearby AirDrop users. Especially if you have an iPhone 11 or later.
- You might have some old version of the iPhone. In that case, you will see a list of potential AirDrop recipients within the range.
- You will see two types of people or devices with whom you share the files. In the People row, you will see the known contact while in the Devices row you will see your own Apple devices. You can select any of them to share the files. Moreover, the nearby AirDrop users will be visible in the Other People row.
How to accept the AirDrop
- Once you select the recipient, they will receive the notification of the material being shared. Here, they will have the choice of acceptance or rejection. This feature will not show up when you will share files with your Apple devices.
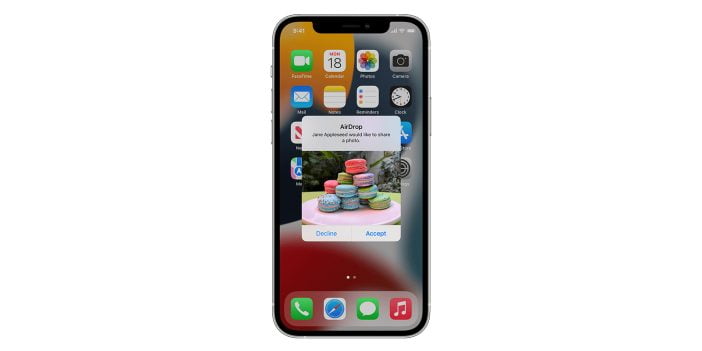
- Upon accepting the AirDrop, the file will open in the same medium it is sent from. For example, photos will appear in the Photos app. Moreover, App links will open in the Apple App Store and websites will open in Safari.
How to use AirDrop safely?
Everything has its flaws and benefits, and most of it depends on you. Using AirDrop safely without giving freewheeling access to everyone to share anything is important to keep your temperament calmed and composed. So, let’s know how you can restrict the accessibility of AirDrop.
- Long press the Wi-Fi icon from the Control Center. You can do it on both iOS and iPad.
- In the next step, try to select the AirDrop.
- Here, you have plenty of options. You can fully disable the AirDrop, and restrict its visibility to the Known Contacts only, or to your Apple devices only. This will give you greater leverage over security and privacy.
Concluding Remarks
File-sharing can sometimes become a hectic task. However, Apple’s AirDrop eliminates this burden as well. It gives the autonomy to share photos, videos, documents, and even websites wirelessly through Bluetooth and Wi-Fi.
Only Apple’s ID email address is essential when sharing the files. Users no longer need to use Dropbox and Google Drive to share the file. By following the steps mentioned above, you can anytime take full advantage of Apple’s AirDrop.\n\n




Share Your Thoughts